

The reason for the dehaze is to add or remove haze air cloudiness or from a photograph. If you have a picture with some low-lying haze in the image that is ruining the detail behind the scenes, a great deal of it tends to be eradicated by different instruments. The technique for every photo enhancer to dehaze is somewhat different. Losing or wasting a great shot just because of haze isn’t a good idea at all. Let's go through the 5 best practices to dehaze images utilizing a dehaze tool.
How to Dehaze in Photoshop?
The upgrading of Photoshop unveiled an essential feature of the dehazing tool. There is a visible amount of fog/haze in some hazy images, but it's an old shot we can't retake. Instead of wasting that photo, we can get that pretty scenery behind that by removing that haze using the dehaze tool. This tool of dehaze images has become a global success due to becoming the adobe CR adjustments and for following users to either add or remove haze within seconds.
Removing haze from photo:
- Open your picture
- Convert your picture into a brilliant item (Filter > Convert for Smart Filters). This is constantly viewed as best practice for working non-dangerously.
- Open Adobe Camera Raw (Filter > Camera Raw Filter)
- From the Basic Panel, drag the Dehaze slider to one side to remove haze.

How to Dehaze in Lightroom?
You can dehaze a photograph in Lightroom Classic CC to work on the photograph's sharpness. This impact allows you to change the measure of fog or mist in a photo. You can eliminate haziness in a picture to build lucidity. On the other hand, you can likewise remove haze from the image to make a creative impact.
Steps to Follow:
In Lightroom Classic, find a haze image that you might want to slice through. Far off scenes or coastal scenes are great competitors.

Open the Basic panel in the Develop module and look for the Dehaze slider. To lessen the haze in the scene, drag this slider to the right.
To increase haze, experiment with dragging the Dehaze slider to the left. This is useful for softening a face or producing the appearance of mist or fog in a landscape photo.

How to Dehaze Photos Using Luminar?
Now and then, our photographs don't look very as lively once they're on the PC screen. For example, shooting RAW documents or touching a light mist can periodically make our photographs peer somewhat cleaned out. For these occasions, Luminar offers the "Dehaze" effect to slice through that murky look and re-establish aspect and shading into your image.

Dehazing Images in Luminar:
The Luminar "Dehaze" channel is easy to apply and productive at fighting that cleaned-out photograph look. Essentially select "Add Filter" and afterward "Dehaze" starting from the drop menu. The sum would then be changed utilizing a slider bar on the right half of the screen. You'll take note that the channel pulls in features, adds more shading to the sky and complexion, and increases tone and difference. Therefore, you can use this channel to improve any shot! Try it out! It's easy to utilize, and it's an all-in-one resource for every one of the components you'd use to re-establish aspects to a hazy photograph.
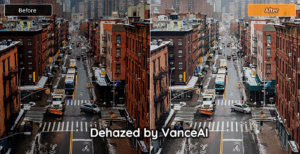
How to Dehaze Picture Using VanceAI?
VanceAI offers you extraordinary VanceAI Photo Dehaze apparatuses to improve pictures accessible on the web. You can use this online tool to easily dehaze photo in one click.
Using this dehaze tool is simple. Just upload your photo and adjust the requirements accordingly. Within seconds get the Uber chic dehaze photo.
THANKS TO CUTTING-EDGE DEEP LEARNING AND AI ALGORITHMS. VanceAI is your most outstanding AI assistant in graphic design and photo editing. With remarkable AI features, VanceAI can help you spice up your projects, such as VanceAI Photo Retoucher to brighten your images, VanceAI Image Enlarger to improve image resolution, and so on. There aren't any brushes. There are no complicated layers.
How to Dehaze Using LUNAPIC?
Dehaze photo could be a tough job, but these tools brought ease. Using this fantastic tool has given me the best experience with its super easy interface. Using it includes simple steps. Let's go through these steps once.
- Use Lunapic to Dehaze your Image!
- Use the structure above to pick a picture document or URL
- Later on, use this element from the menu above LunaPic > Adjust > DeHaze.

Final Words:
So here are the finest five tools to utilize for dehazing photos. All these reviews are based on the experience of various customers. This will undoubtedly allow you to choose the best instrument. Anytime if you want to further enhance your image, such as increasing its resolution, try Image Upscaler then, free and easy!